Guiding Sprites - FMP Post Mortem

For the final major project I decision was made quite a while ago that it would be interesting to work within a group to create a game, something which I have had interest in taking on since college.
Myself, Amber Jamieson and Hazrat Bilal set up a team name, branding and social media to push our game under: I_DO_TRI, this was a first step towards the goal of becoming an independent developer.
The main thing we wanted to push as a group was the fact that whatever we made had to be playable and interesting to people outside of game art circles, this was very important to us as simply having a large environment could only be something of limited appeal. While having a small game that people could play instantly is a lot more indicative of what independent developers would create.
My personal goals during this project mostly concern the technical side. I’ve always planned to use unreal engine to it’s fullest extent when it came to my fmp, working within a group on a game allowed me to play around with game design, blueprinting and materials and fx; all of which are skills I wish to develop to enhance my employment within the indie game scene as well as give me some skills so I could start my own if I wanted.
Note: This post will be a very large summary of everything I have contributed to the project in as much depth as possible, so I’ll try to include more high res blueprint graphs and material graphs where I can as well as videos, screens etc. So expect it to drag on a bit, below is a bullet point list of everything I have done on this project for ease of reading, then past that is all the images and some additional text in places.
Research/Prototyping
- First month game design and prototyping
- Character movement - Burnard can jump, Walter can’t but travels faster
- Switchable characters iteration on basic implementation from Hazrat, added respawn capability, and AI buddy follow components. All in game mode
- Rain Hazard object (Later unused)
- Fire rope burning
- Lanterns
- Burnable Crates
- Pipe travel
- Pickups (Plus counting system, which includes hidden picture pieces.)
- Key blueprint that attaches to player socket
- Pushable crates (Later unusable)
- Olive trigger volume movement, needed flexible approach
Level design and implementation
- Second month level design, Blockmesh, creating plans for modular kit for Hazrat
- Blockmesh assets for sizes, passed to Hazrat or Amber for final models
- Changing size of level
- Creating landscape and testing out level with blocks while working on gameplay, landscape rocks and landbridge
- Overcast lighting pass using dynamic skylight, atmospheric fog and DFAO
- Master material setups
- Walters material
- Markers
- Concept paintovers from art direction
- Spline Camera system work, DOF on character camera, camera trigger volumes, player start
Materials, environment and FX,
- Rainfall effect
- Player Rain BP
- Burnard's flame - flipbook and experimentation
- Landscape material work and level mesh vertex painting
- Foliage - Grass
- Water shader and waterfalls
- Trees
- Lighting pass, new skybox
- UnsharpMask
- Climbers and bushes
- Pickup particles
- New fire particles and rope burning particles
- Animation setup of characters
Other fixes, refinements and polishing
- Raindrops, and example content fog sheet placement, atmospheric light rays
- Importing assets ,setting up materials and placing in level
- Cloth material with wind displacement
- Continuous playtesting and setup of inputs including XBOX controller
- AI Overhaul, Olive blueprint redone and now includes marker points for movement, AI volumes to control pathfinding
- Change to central area, now a park with more gameplay
- Matinee Cutscenes (Skippable cutscenes)
- Sounds (Audio volumes for interiors, settings and blueprint setup.)
- Creating Intro and Outro video UI and I_DO_TRI logo splash screen
- Floating helper UI icons
- Flythrough mode for cinematic recordings
- Game flow level blueprint, map reset on quit.
- Changes to title screen.
- Collisions, accent lights, camera tweaks, sound tweaks
Project Outline
We had a bunch of ideas initially of simple game concepts, some concerning first person experiences while others were a little further afield. An idea I come up with was of a little fire spirit that could affect the environment by burning objects to reach higher places, all while avoiding getting put out by the rain, this idea was what got expanded into the full project.
The basic premise became that there was a fire character and a water character that could co-interact with each other, which was the main mechanic for getting through puzzles. We also brainstormed narrative and subtext and included a third character, a young girl, as a narrative guide for the story. Olive acts as an NPC character that would guide the player through to the next section, the spirits are there as a result of her actions so she relies on their help.
The overall plan for the project was to create a small vertical slive of a full game, like a demo, that could act as a pitch to potential backers. This would have to be highly polished as well as show one or two of the basic mechanics, narrative and the initial art direction.
Mechanics Testing
During our initial brainstorming we came up with a few ways on how the fire and water characters could interact, it came up quite early that each character has their movement emphasised in different ways. I created these slides for our initial presentation which show off the abilities of each character.


Switchable Characters and AI
In the first week my job was to make the basic movement component for the game, and implementing the switchable characters. Hazrat already given me the basic blueprint for the switchable characters which used possess nodes for the player to take control of different pawns, however because this was place in the level blueprint it wasn’t very reusable, so I reworked the script into the game mode. I iterated upon this and added in respawn functionality and an AI buddy follow functionality.
 |
AI follow functionality, uses AI move to nodes alternatively according to what character is currently controlled.
|

^Spawning logic, the top row is the respawn mechanic for if a character dies, the bottom script is the initial spawn, which outputs the spawned character into a variable for use in other blueprints.
Fire Character - Rain Hazard
Next I worked on a basic hazard for the fire character in the form of a rain small floating rain cloud which would cause death for the fire character if stepped under, this was later unused in future gameplay as we wanted to simplify the gameplay. This works by casting a line towards the ground which will be used to calculate the bottom of a collision volume which changes location in realtime allowing moving falling water volumes that could harm the fire character. If the fire character intersects it a death event is called on the fire character, sending over information on the type of death ‘Water’, this is designed so there could be different functionality for different types of death.

Fire Character - Lanterns
The lanterns were relatively simple to setup, I just used a sphere collision to detect whether the fire pawn has overlapped it, which then triggers a point light and a particle effect, later I would add more functionality to the lantern , allowing a customizable radius and an activation switch.


Fire character - Travel by rope burning
The rope burning was perhaps one of the most complicated blueprints I have worked on in this project as it required a lot of trial and error to get it working both ways, later through a bit of help from Hazrat and through some logic workings out on paper I managed to get it to work almost perfectly.

The construction script and event graph were both quite extensive as I actually needed to generate a spline path inside the blueprint for the fire character to follow, as well as place the collisions correctly, allowing the blueprint to be reusable in wherever we would need it in the level.
The next image is the main graph, this is the bit which taken the most time as we couldn't figure out how to make sure the character didn't keep reactivating the trigger at the other end. This meant the fire guy would just travel back and forth on the rope endlessly, we fixed this by creating an 'OnWire' variable that would disable the input while true aswell as other checks that detect the direction of travel.
 |
| Rope Burning Graph |
Key
The key was a required object that allowed the player to access the next area, I implemented this by using a script which attaches the key to a socket on the character when picked up, a trigger volume in the level looks for the key to overlap to unlock the corresponding gate.

Fire Character - Burning Crates
I worked on burning crates next, still trying to burn through our initial list of mechanics. The crates were a bit more difficult than I anticipated, more work would have to be done later on to get them to work properly. They work by looking to see if they have overlapped with anything that is on fire or the fire character, if so they will spread fire to whatever is with their radius, so it should spread like actual fire.

I also created a construction script for the crates that allowed me to alter the base meshes and trigger volume sizes, giving me a bit more flexibility for level design in the level.

Water Character - Pipe Movement
The pipe follow blueprint was an adaptation of the rope burning blueprint; it was only designed to work with the water character and hard corners rather than a smooth curved line like in the other blueprint. Unfortunately this was a bit harder than I first thought, I needed to create a slightly hacky way of saving the last reached point on the spline and then increasing that value by one each time until the character reached the other end.

Pickups
While working on the key it was decided as a group that there would be some general pickups in the level, which I worked on for a morning, I created a base blueprint class
‘Pickup’. I then used this to create child blueprints for a general spirit pickup and a more unique photo piece pickup; of which there would be a limited amount to collect in the level.


The pickups function by casting to the game mode and adding a value of one to the collected pickups variable everytime a pickup is collected, this variable is then read by the HUD which I will detail next:
UI - Game HUD
The game overlay is summoned from the game mode blueprint, and from there it gets the collected pickup values, this is then used to set the numbers of the UI through a combination of appended strings.


UI - Main Menu and pause menu
The main menu and pause menu are almost setup the same apart from a few changes, the main menu loads in the Island map whereas the pause menu is called in game and just sets the game timer to 0 but also includes a quit to menu option, more work is done in the UI later as the main menu map is abandoned as an optimization, so the main menu is later worked into the island map instead.


Pushable Crates
This was a functionality that I was working on for the water character, unfortunately due to a bug in the engine I couldn’t have them work consistently so we had to abandon the idea, the script though was very simple to set up, but the physics reacted differently depending on the character even though no settings were changed.

Olive - AI Follow and triggers
Next I worked on Olive’s movement through interacting with trigger volumes, when the player walks within certain trigger volumes, Olive will move to the linked target point using her AI. This was created so Olive could be in predetermined NPC positions in the level so she can guide the way in certain areas.

Level Design and Gameplay Testing
The second month was spent implementing the level design from Hazrat’s and Ambers original sketches, I also worked on a couple of preliminary puzzle designs that Hazrat later worked from. To make things easier for myself I created a modular kit that I could use for level building and testing out functionality, this later went to Hazrat for use in planning out the modular environment pieces.

I first experimented with the landscape in UE4, in order to create a coastal shape that we liked going, again from the original sketches. I then worked on using my modular kit on top to create a loose blueprint of a city.


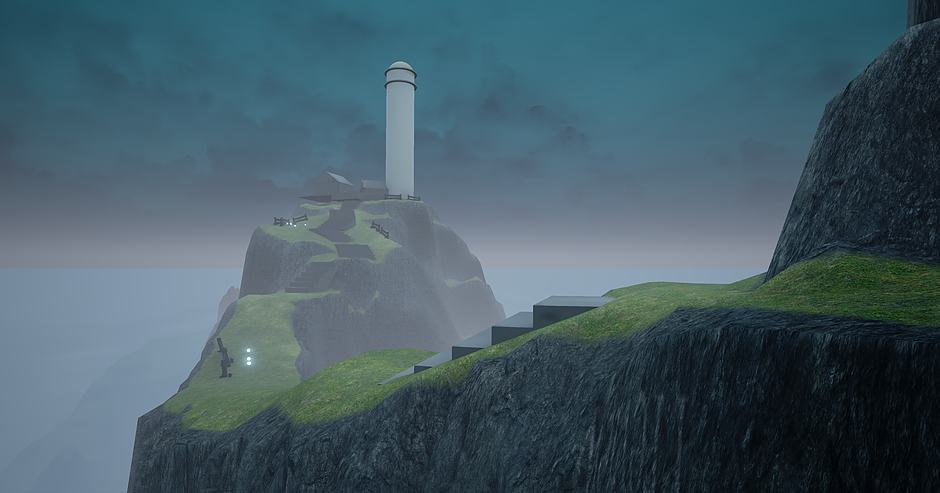
The idea behind the level design was to create a bend round so you could see the lighthouse from the start of the level as a sort of end goal, the curve of the bay emphasizes the direction you have to travel, making it easier for the player to know where to go.
We were advised as a team that our level was massive and needed cutting down so I worked to cut out the middle sections of the level, moving the whole lighthouse area closer by connecting it to the center piece of protruding land.
I included the house blockout next which Amber blocked out form her level design, this was separate section of the level but I had to test the flow from the interior to the exterior, when this was in I replotted the puzzles playing through into the courtyard area I plotted in my original level design. Here I also altered the scene lighting trying to replicate an overcast lighting setup, I tried to achieve this using a movable skylight using DFAO but eventually that started to run a little too slow for our level because of it’s size.

For the exterior I worked in creating a static mesh for the base of the level as it gave a better result than the barebones landscape, so I exported the level into 3dsmax and created a mesh roughly in place of the assets, I also did something similar for the landbridge leading to the lighthouse, later I would create a vertex paint material for these assets. Next I created some giant environment rocks in 3ds max that I could use to fill the environment and hide nasty landscape shapes.


Master Materials
I setup a master material that I could use to create instances from, making quicker for the team to import assets and keep within certain artistic boundaries. This involved me creating a long material graph using a variety of switches that can be triggered on or off for each instance, enabling or disabling different texture maps.

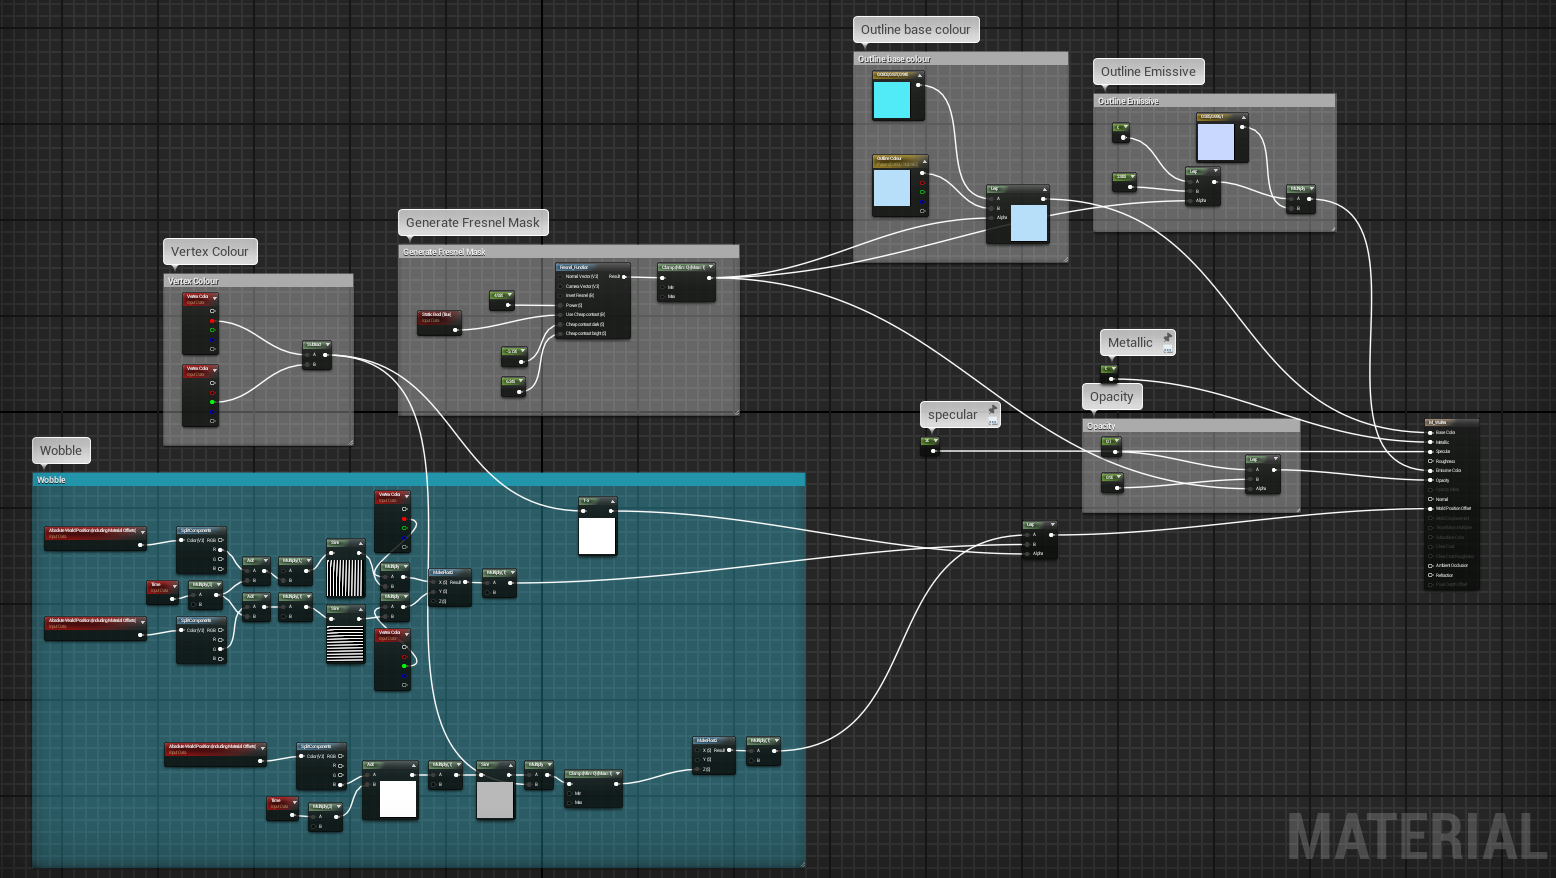
Walter Material
I worked on Walter’s material first as Burnard required a bit of a different setup which I had to figure out later on, I used a vertex blended displacement, a fresnel glow and some other wobbles to create Walter’s look, I liked the look of him fairly early on so he didn’t need to change much.
Markers
For easy readability for the rest of the team and people looking to provide feedback on the game I created markers that could be placed in the level to label parts of the scene, these didn’t take that long to make but they helped with some level planning in the early stages.

Concepting and paintovers
I had a brief period where I came away from engine to focus on doing some level paintovers from provided reference, just showing what some of the structures might end up looking like. The goal was to establish some of the lighting and colour, and working on keeping a slightly rainy overcast look with hints of sun coming through, because it is overcast there would be a focus on the local colours in the scene.
In terms of buildings we were looking to create a blend of european architecture and asian slums, with an emphasis on the reuse of objects within the town (upcycling).

Earlier in the project I created some loose sketches of what I imagine for certain parts of the game, some of these areas have now been cut but the art direction still stands, things are covered with corrugated metal and wooden planks yet the environment is still meant to feel quite homely.

This is the main paintover document, as you can see these are different angles of the level with varying levels of paintovers done to show what each area would look like. The colours needed a lot of tweaking however as I struggled a bit to get it right, I corrected some of the colours in a more polished painting to show the look of the game in a bit more depth. Also here I used the opportunity to circle assets that be modeled as props for the level.
 This next image contains some sketches for the lighthouse design, we wanted something that looks like it has been reinforced by other structures similar to what the town is like, the lighthouse is meant to be quite a spiritual place as well so a thought was for the lighthouse to be decorated in various patterns and shapes that could have been painted on by the owner to represent different spirits.
The next image is a more polished version of one of the paintovers, this time with the colours corrected. this is used by the team to establish what the textures and some of the environment props look like as well as what the rain effect could look like when finished.

After this I produced a material breakdown that Hazrat and Amber could use while creating textures, this just helps along some of the guesswork for what things are meant to look like in our level the textures have to be stylized. Adding notes and art direction on each type of material makes it easier to ground what look we are going for even more, with refinements and changes made as we figure out what works best.

Camera Blueprint, Triggers, Spline Camera, LookAt Camera and custom player start
The camera system was probably the most intensive blueprint of them all, trying to get it to work on two different characters was a nightmare. It required a lot of tinkering and figuring out, I mamaged to get it to work by creating a custom camera trigger volume which passed new camera information to the character that enters it. First up is the blueprint for the Lookat camera; this is a stationary camera that follows the player location.

The camera system relied on a camera trigger and a system within both characters that handles the switching of cameras correctly, this camera system also handles the depth of field effect on the player’s camera, auto applying the effect to any possessed camera.

The most important part is the trigger itself, which uses a blueprint interface to communicate to the character that entered it, this is used to pass the camera linked with the trigger volume to the character and set it as the current.

The spline camera was hard to setup but I followed a tutorial on it’s creation, once I had everything in place I would simply plot out the camera tracks inside the engine using splines and the camera would give the cinematic shots we needed.

Lastly I created a custom player start so the characters could spawn correctly and so the cameras were handled correctly upon the start of game. This main reason for this was that using traditional player starts didn’t really work with two character pawns.

Materials, FX and environment

I was responsible for creating all of the materials and FX in the level, with the particles I started with the rain as it helps a lot set the mood of the level, some of these I had to tweak as I progressed, with the rain the first pass didn’t really work as I couldn’t get the raindrops to work.
Player Rain BP

The problem with rain was that I would have to duplicate it a lot to make it look like it is raining all over the level, one trick that designers use is that this trick of attaching the rain to the playable character so one rain emitter is always in the scene just above the player, so it always looks like it’s raining, the other issue is that triggers were needed to make sure it wasn’t enabled in certain places.
Burnards Material

I created a flipbook texture which contains 16 frames for the flame animation which would be played on loop, the material has a slight warping and obviously an emissive control.

Landscape Material and level mesh vertex paint blend

I had to create a separate material for the non-landscape ground meshes so i create a vertex colour blend material so I could decorate the floor of the level.

Below is one of the material functions, which are ussed in different materials in combination with material parameter collections to keep the settings consistent across the different assets.


Grass and Foliage
I created the majority of the foliage in the level, starting with the grass which I adapted from an old version I made, it has controls for wind displacement, SSS and colours.
I also created trees for the level as well as LODs which use a dither transition, these became necessary as the foliage was eating into the framerate a lot.


I also created climber plants for the sides of buildings, I created them by rendering a straight section out onto a texture sheet then deforming that along a path for the climbers.
I also create some small bushes which proved to be a great filler asset for the level.


Water shader and waterfall
The water used a layered offset of a stylized caustics texture and was inspired by the water used in Ni No Kuni, I tried to stick to this as closely as I could while having it react to lighting correctly.


Unsharp Mask Post Process
I created this based from Koola’s Unsharp mask used in his Archvis projects, it is useful for keeping things looking crisp, as Unreal has a tendency sometimes to over soften what’s on screen.

Rain drops
 |
| Rain drops particle, individual particles constrained to the Z axis. |


Everything else - Polishing, refinements and overhauls
Animation tree setup for characters and blueprints


Cloth Material
Used for flags, clothes, rope and cables

DuoGameMode Overhaul of AI and respawn section

Level Blueprint
This includes a large number of things so I'll just cover them in bullet points:
- Checkpoint setting
- Special camera switches
- AI triggers
- Matinee cutscenes and event controllers
- Unique trigger events e.g. Water vine UI activation
- Flythrough mode for recording gameplay
- Intro and outro sequence control, including pre menu game setup and background music
- Skip cutscenes function

Sounds
Implemented background noise and music into level aswell as include audio volumes to create interior reverb and low pass filter of the rain sounds outside.
Intro/Outro Video UI blueprint
 |
| Widget blueprint of the intro UI which needed explicit control of the playback for it to work properly. |
Character UI Pop up icons

Title Screen - Camera setup, Post Process and UI implementation

Population and set dressing
This included a change in the last couple of weeks including the addition of the dock as a proper end to the level, and a layout change of the center puzzle area which is now more open and now has better level flow.
Reflection and Summary - plus some nice screenshots
This project feels like it started years ago, so much has been crammed in to make it what it is. It has been great to see how far it's come along from just a couple of different coloured balls moving around a greybox scene.

It has been a difficult project however, from a lot of different aspects. My main issues seemed to all stem from the fact there was gameplay featuring three characters which involved a lot of head scratching and workarounds, the camera system was the most obvious victim of the multiple character problem as I had to make it remember where the camera was for each character. I managed to work through a lot of these kinds of problems by using my notebook to figure out the blueprint logic.

My favourite parts of the project and the bits that I think turned out best was the ground material system aswell as the camera system. I'm really happy with my landscape and level mesh material as they take values from the parameter collection they will always be consistent across different materials which made it real easy to make huge tweaks with the materials in the level. This also applied to the material function layers for materials I had used, which meant I could layer in mud, grass and cobblestone how I like without having to set them up twice in other materials.

The camera may have been a headache but it is still one of my favourite aspects of the project. The main reason for this is that it's pretty much fully automatic, the camera mainly stays exactly where I tell it to unless the players go close to underneath it, the only thing with is that I wish it was a bit smoother in the transitions, as they look a bit buggy currently.

I am happy with the overall look of the level, I have pushed the lighting and mood a lot using the rain, moving clouds and fog sheets to try and get the look we were going for, and in the end I think we got there, a slightly stronger art direction and maybe some tighter concepts might have helped in this area and helped cemented some design decisions. I still think the environment could be a bit more polished and have more detail that makes it feel lived in.

For improvements, I think more could have been done with some of the core gameplay, mainly around the AI. But my time was restricted and I had to move on to other priorities, my wish was that more of the interaction between Burnard and Walter was worked in as a puzzle element but that is something that we could include if we were to continue the project as a full game.

Something else I would have liked to contribute more to is the modelling as I had it down that I would be doing more of it in the project. I planned to model the lighthouse among some other things but I was too involved with getting the gameplay to where it needed to be, so the other two in the team taken the job. The main thing that I think the level needed later in the project was more natural assets like small unique rocks and more climber plants, I did manage to do some of the foliage though which contributed a lot to the look of the level.

I learnt a lot about my capacity to juggle tasks on a project like this, I was involved in Off The Map before where I tried a similar task but this time I tried to stay as focused as possible to my core role of engine, materials and fx and I got more done as a result. I wish to continue this going forward while trying to create a more solid workflow for myself. I have learnt loads from this project because of the amount of time I have spent in engine, creating blueprints and materials will come a lot quicker in future projects and I have a lot of reusable assets I can take and modify like the master material and effects.

Where Next?
After this project I will proceed to keep working on my graft, using the reusable engine content I have created to speed up my workflow during some personal environment projects where I intend to focus more on asset creation and polish. This will be preparation for my masters where I will create small narrative based gaming experiences which possibly might use technology like VR. The other goal is to continue publishing work under I_DO_TRI as we attempt to build it up as an independent studio.
Resources, our websites and knowledge dumps:


Comments
Post a Comment
Leave a comment, I'll try and get back to you soon as possible. ^.^